I just finished converting my small electrically ETS 102 rectifier from 2 rail to 3 rail operation.
This engine is from 1996 and it used to ran fine on brass ETS rails, but now that I have finished my new layout with Merkur rails, I decided to convert it to 3-rail operation. Therefore, I needed to disassemble the engine. This involves sliding the roof of, loosening the two top-light LED's from their fittings and removing two screws that hold the engine-block to the bottom plate.
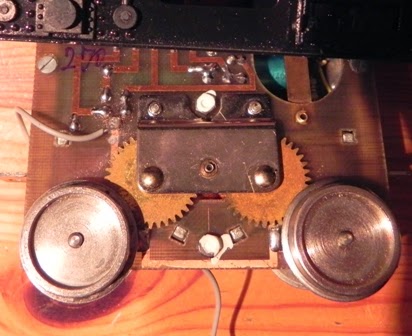
The new 3 rail pick-up assembly is from Merkur. A small pine wooden plate was made in which the 3-rail pick-up assembly fits tightly, which in turn fits tightly in the underside of the engine.
A connecting orange wire was soldered between the electrical pick-ups of the left and right wheels. The connection between the wheels and the engine was disengaged by cutting though the print-plate and soldering a new grey wire between the loose connection and the 3 -rail pick-up.
Below, you see the new grey wire to connect the 3-rail pick-up and below the soldering point is the broken connection to the wheels.
And after assembly the engine run fine on 3 -rails with DC power from an ETS transformer.


2 comments:
Mooi dat zo'n lok toch eenvoudig om te bouwen is, al klinkt het vreemd dat dit met een houten balkje moet.
Ach ja, Frank, dat hout kwam gewoon goed uit. Ik zocht een stevig, isolerend materiaal dat ik eenvoudig in vorm kon krijgen. Ik had hier wat dun vuren en een plexiglas-plaat. Ja, en dan vind ik hout toch wat makkelijker te zagen en vijlen dan plexiglas. Verder heb ik er bewust voor gekozen om deze houder vast te klemmen, zodat ik niet hoefde te gaan boren in de metalen kopse kanten of de printplaat-zijkanten.
Groet
Eggo
Post a Comment