Sunday, December 10, 2006

Making decals for the Lionel 1722 caboose


For the past week I was busy cleaning up a scanned picture of the side of the 1722 caboose. The plan is to paint the side red, to paint the windows and oval symbols yellow with the help of masking tape and to finish it of with a large decal that shows all the black details: rivets, lines, etc. Two decals have to be made: one of the side panel and one of the head side. Since the caboose is symmetrical a double print of both will do for the complete car.
Now, I started to straighten out the scanned picture, to convert it in black and white, to remove all unnecessary details and to repaint the lines and rivets. It is almost done. I finally learned myself into Paint shop Pro, because I needed some tools I never used before.

Monday, November 27, 2006

Priming with Hammerite


Although both the Lionel 812 and Lionel 1722 are clean now, there was lots of rust on them and much of the surface is bare iron in stead of tinplate. Therefore, these cars were prime-painted with a special Hammerite rust preventing paint. The colour is not very appealing, but it is only an undercoat.
The 1722 caboose has some dents that need to be filled with plaster. Furthermore, I am still busy with the top roof. The top-roof will obviously receive a normal primer (for non-ferro metals) when I am finished with it.
The 812 gondola has several rough spots where rust has eaten holes in the side panels, that still need to be filled with plaster. So, there is still much to do.

Thursday, November 23, 2006

A new start for the Lionel 812 gondola


Cutting the brass plate and getting the holes in on the right place was quiet some work. The Proxxon SS230 mini-cutter together with the old fashioned drill and the Dremel were handy to get the shape right and the holes in place.
Today, I finished soldering the side boards back on the new base plate. A new gondola is born... Although there is still enough to be done, it is nice to see that it is starting to look like a gondola again.


Some people might argue that buying a second-hand base plate is much easier. Well that is right when you have easy access to those. Here in Europe it is rather difficult to get spare parts, unless you order them in the States. Moreover, these base plates of the 812 are not ubiquitously available in the US and hence it is quiet a challenge to repair this Gondola from the bottom on.

Other people argue that buying another old 812 Gondola can be used as a base plate donor. But what about the other old car then? I prefer to get them all running again!

Sunday, November 05, 2006

Rust and holes


The rusting of the Lionel 812 gondola car is more severe than thought previous. Several additional holes have popped up while de-rusting the car with Dremel brush and grinders. The base plate is too weak to be trusted for a restoration project. Therefore, I have bought a nice brass plate (K&S, #253, 0.032 x 4 x 10) and I have made too clean cuts on the edge lines of the base plate. One side was very easily cut, the other side had more iron still in it and proved a little bit tougher. Hard to imagine that this pile of junk will once be a nice car again.

Tuesday, October 31, 2006

Lionel 610 almost finished


Today, I assembled the Lionel 610 passenger car. I gave it new couplers, but for the rest all the old parts have been cleaned and re-used. The car was an utter wreck without a roof when it arrived and it is nice to see it in this condition now. The only things left to do is getting the decals, repainting the roof once more and getting the light sorted out. The interior lighting works, but the lamp does not shine steady, so somewhere the is a loose connection from ground of the lamp to the wheels.

Sunday, October 29, 2006

Lionel 812


This Lionel 812 pre-war gondola just reached me in time. A few additional years of wear would have made it non-restorable: just for parts. The 800 series freight cars have been made with thicker steel sheets than the cheaper 600 and 1600 series. That has saved this car. During my usual cleaning ritual holes dropped in the car floor. The rust has gone completely through. It makes you wonder was must have happened to this car. Had it been lying out in the rain for a couple a years? It sure would explain the significant rusting. I will have to cut out a major part of the car's floor and replace it with brass plate soldered in.
One day this car will shine again, but it can take a few months!

Saturday, October 28, 2006

Lionel 1722


Recently I acquired a Lionel 1722 pre-war caboose in poor condition. It is rusting, the paint and lithographed picture are poor. And most strikingly it misses a top roof. The top roof used on this model were pretty daft. There were only windows to the sides and not to the front and back. Since, I didn't have a top roof anyway, I decided to be a bit more creative and make a top roof myself from brass plates.
One of the obstacles to make a nice top roof is the wobbly roof itself. It has been folded up and a break / twist line runs diagonal of the middle section. This needs to be evened out by hammering. The triangular missing part of the roof has been filled with solder and brass.
So, there is plenty to restore on this one. The most difficult part will be restoring the lithograph. The current plan is paint the body red, use masking tape and paint the windows and ovale symbols yellow and then to laser print black decals for all the rivets etc. I never done this before, so it is quiet a challenge.

Sunday, October 08, 2006

Spray painting the 610 passenger car


After looking at the webpages of Terry Gibbs, I decided that red body, cream windows, black tanks and trucks and a maroon roof would look the best for my 610 passenger car. So, I started of spray painting. I like to apply double layers; first one layer, then drying in a transparent drying box with a Tyvek window in the sun and after 30 minutes another layer and then 3 days of drying. I used to work with a Bagder airbrush set, but I like the large spray gun better. This handles thicker paints that dry faster and smoother. The disadvantage is that the spray can takes more paint and the paint tube is longer and both need to be cleaned intensely afterwards. Anyway, I like the large spray gun better. So, today I finished with red, cream and black. I just have to do the maroon roof. I will wait for the 1722 to be ready for spray painting, so that I can paint two roofs maroon simultaneously.

Sunday, September 24, 2006

Priming the Lionel 610 passenger car


After the cooking pot treatment, there was still some yellow smuck, predominantly on the inside of the passenger car. This was removed with a brass scraper and a brass bruss (dremel tool). The outside of the car can be brushed most easily and the tin really starts to become glossy. The picture shows the car halfway the brushing treatment.
Several metal tabs were already gone or flimpsy. Thin brass strips of a L-profile (3 mm width) were cut and soldered on the inside of the passenger car to replace missing tabs. The excess of solder was sanded off. Some existing trabs were reinforced with solder.
Then the car was thoroughly cleaned with white spirit and primed with a standard light grey primer for non-ferro metals. Finally the car starts to look good again. Now, I only have to choose the final colours...

Saturday, September 02, 2006

Stripping paint from pre-war Lionel cars


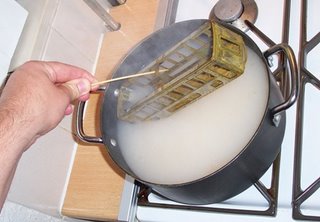
There are many ways to strip paint from pre-war metal tin toys, including: sand blasting, sanding, immersion in white spirit or ammonia and cooking in detergents. The latter method is by far the easiest. You basically take a big pan, fill it up with water, add some normal detergent without bleaching agents and let it come to boiling temperature. Then you immerse the Lionel parts in the pot and let is stand for at least 30 minutes on low fire and occasionally stir the mixture. Afterwards you take it out, rinse the item with hot water and lightly sand the places where some paint had remained. In the corners usually some paint is left, and I use a brass scraper (brass is softer than tin-plated iron) to gently remove the left-overs.
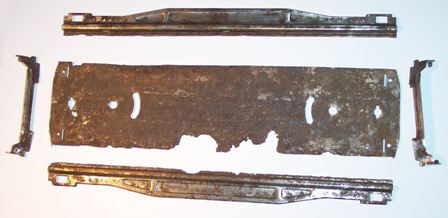
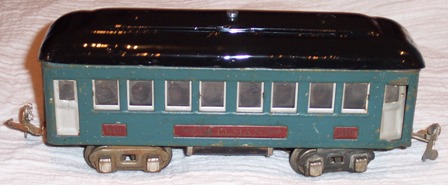
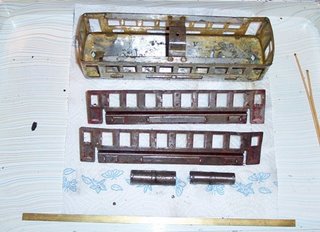
The photo's show the 610 passenger car in dissembled state, in the cooking pan and out after two rounds of cooking. The trouble with this car was that it had been redecorated and a more modern paint which was less easy to remove. It formed a thick sticky yellowish gel and I sanded it of with hot water and a kitchen sanding sponge.
Good luck and mind that the water is really dark coloured after cooking the first time, do not stain your clothes or kitchen with it.
Regarding the alternative methods:
1) Sand blasting works great, but you need to set up your compressor and blaster / cabinet everytime. If you got a permanent set-up, that is great, but otherwise it is a lot of extra time
2) Ammonia immersion works, but stinks and the exposed metal parts get slowly discoloured
3) Sanding is great and there are nice mini-sanders for the hobby available, but it is a lot of work!

Friday, September 01, 2006

Looking for Lionel

Whenever, we want to see how a pre-war Lionel car exactly looked, web search engines offer often little help. For instance, type in "Lionel 1664" in Google and wait what comes. Usually, the vast majority of the links shown are auction sites (Ebay etc.) with often outdated offerings which can not be retrieved and observed anymore. Followed by a few Frenchmen, Quebecois and a singer named Ritchie. This is rather annoying. Simultaneously, there are much useful websites of train enthusiasts, professionals which offer sharp pictures of Lionel train objects, however, these are not easily found with conventional search engines. Moreover, these sites are usually far from complete, but combining them would improve their coverage. Hence, I thought that it would be a good idea to start with list of links to those "hidden" sites on the web which offer precise pictures and to let it grow organical and indexed on the Lionel number.

Here are the first links:
TG for much useful information of Terry Gibbs

SW for 804, 805, 806, 807, 831, 2653, 902, 1682

GTE for the great Glancy train exhibition that includes: 400E, 400T, 607, 608, 656, 2817, 3814

221
224
262
1666
1688E

Sunday, August 27, 2006

Fun with pre-war Lionel trains


It was time to empty the boxes and run some pre-war Lionel trains. It really amazing how smooth these trains run after 70 years. Since, the 1688E is not compatible with the 027 switches I put him aside, its wheel flanges are simply too high. The 1666E is really a smooth runner and was giving the task to run the freight train of wagons of the 650-serie: 655, 652, 651, 659 and 657.
I also managed to deal with the jumpy pilot wheel of the 289E locomotive. The spring metal had been assembled the reverse way. Reversing the spring ensured that the pilot wheel is firmly pressed on the rail and now it does not derail on the switches any more. The 289E headed a passenger train with 1630, 1630 and 1631 coaches.

Tuesday, August 15, 2006

655 box car restored


Half a year ago, I bought a highly abused toy train car and I am proud to announce its restoration complete.
One side of the box car had a corrosion spot, as if somebody had dropped acid on it. When cleaning the affected region, I soon realised that this was a major defect. When the metal was sanded bare, a hole of a quarter inch became visible and at least half an inch around it the metal was much thinner then normal.
The hole was filled with tin-solder and was sanded, plastered and sanded many times before the side wall was really smooth again.
The paint came from George Tebolt and all the parts are the original ones!
Let's roll the box car!
This proves again that one man's trash is the other one treasure....

Wednesday, August 02, 2006

Holiday in the Jura


During my holiday, I visited the small steam train in the French Jura mountain named Coni'fer. The wood-fired 0-6-0 steamer runs from Hôpitaux neufs to a place in the middle of the forest and back. It runs on a part of the former railway Pontalier - Vallorbe. However, a lot of the original track has been removed. A group of train enthusiasts likes to recreate the original full track and lets hope they succeed. I was a beautiful experience.

Monday, June 05, 2006

Slow progress with the layout


During the last weeks I bought two tin buildings: one switch tower from unknown German brand and a small platform from Hornby. I also cleaned some semaphores and the lantern and put them along the tracks. With the Metcalfe freight shed and the self-build station, it finally starts to look a little bit like a layout. There is still much to do, but some progress is being made.
The station was made from Balsa wood, matches, paper and paint. It probably took me 2 years, but little by little, I made finished it. The most dreadful was cutting out the roof tiles from paper. In the end I really wanted to stop, but luckily I did finish it. Inside there are five small light bulbs. Let's hope that I will never have to replace them, because they are glued in.

Monday, May 22, 2006

Metcalfe 0801 0 gauge Goods shed


I purchased this cardboard building kit in a small British hobby shop. It was one of the few items they had in 0 gauge, but I liked it straight away. Since, normal model railroad shops in Europe will seldomly have an 0 gauge item in stock, I was quiet happy. Metcalfe is a English model company, making predominantly cardboard building sets in scale 00 and also a goods shed and backdrop buildings in scale 0.

The construction of the freight station took me three evenings. It is nice work, with regular intervals to let the glue harden. The building description is clear and the work progressed fast. You will need a sharp hobby knife to remove the objects from the cardboard sheets and to cut through the connection points straight. With a normal knife you will get a white fluff spot on the places where it was connected to the rest of the board. The resulting freight building is remarkably heavy and solid for a cardboard building set.

Lionel Boxcars (like this 6464-525 Minneapolis & St. Louis boxcar from 1957) fit right into the station. The freight station doors are about 7 cm in width and 10 cm high. The length of the station equals about the length of one boxcar.

Tuesday, May 09, 2006

Ilkley train show 6th May 2006


On the 6th of May 2006 the UK Lionel lines collectors club organised a train show in Ilkley. Without a doubt, this is the largest European gathering of Lionel lines collectors. There were about a dozen layout and it was great to feel the atmosphere and to see some of the engines and cars that you always wanted to have. A few pictures will tell the story.

Saturday, April 22, 2006

unknown tin toy lantern


I recently found this toy lantern in a second hand toys shop. It works with a 4,5 Volt flat battery (3R12). There are no references to the manufacturer and the production date. If anybody would know, please send me an e-mail.

Thursday, April 20, 2006

Easter railway fun


Easter eggs need to be transported!

Let's run them around before eating them.

Friday, April 14, 2006

Lionel 8770 switcher that didn't reverse


This Lionel 8770 EMD NW2 switcher (blt. 1977) was purchased in Edmonton (AB) in 2000. It ran nicely forward, but did not want to reverse. In reverse mode the motor made all kind of buzzing sounds and hardly moved. The motor clearly looked fully restored and most parts were amazingly clean for a toy train engine of this age. The central axle of the electromotor was found to move 5 mm down in reverse and 5 mm up in forward. In forward mode the brush springs push the axle sufficiently down, but in reverse mode the axle is not corrected by a spring and the transmission between the wormwheel and gear gets frustrated and it blocks. I tried adding several rings to minimise the vertical displacement of the axle and finally that worked. Two thin rings on the bottom (1 mm metal M2 ring with 2 mm plastic ring on top of that) and a larger ring on the commutator (4 mm high, cut from a drill plug) did the trick. The switcher likes to go forward and backward again!

Thursday, March 16, 2006

SD 28 C&O diesel


This SD28 diesel engine is an excellent runner (Lionel 18834, blt. 1994). It has six powered wheels and is able to run at very low speeds. I let it run with a group of box cars (9706, 9715, 9426), a depressed flat car and a caboose (9167). The 9426 is by far the nicest box car. The depressed car is restored and still unnumbered. I reacon that it could either have been a search light car or a transformer car. Since, the car arrived in poor state and the numbers were unreadable, I just painted it nicely and left it unnumbered for the time being.

Friday, March 03, 2006

Modern B&O train


This B&O train is run by a GP9 diesel (Lionel 28514, blt. 2000). It is nice running diesel that pulls long trains and still runs smoothly. It has a horn which sounds a bit like a door chime. In tight curves its wheels will sometimes slip. It pulls a 9130 covered hopper (blt. 1970), a 9701 double door box car (blt. 1972), a Sentinal box car (from boxcar set #3, 1996), a 9783 Timesaver box car (blt. 1977), a 26042 Gondola (blt. 2003) and a 26570 red caboose (blt. 2002). All nice cars that run great. The hopper cover must have been added during the years, because it was originally sold without a cover.

Thursday, March 02, 2006

Modern Reading train


This steam train is composed of 4-4-2 Reading steam engine 8402 (blt. 1984), two green hoppers 16460 (blt. 2002), a gondola with coil covers 17405 (blt. 1994) and a bay window caboose 6439 (blt. 1984). It is a very smooth running train that is able to run very slowly. It forms small smoke puffs while running. The caboose has a bit jumpy third rail connector and needs a new spring. Twenty years ago I added some light sewing machine oil in the chimney and it still smokes, although the smell of the smoke is less attractive nowadays.

Monday, February 27, 2006

Extending the roof for Lionel 610


Sometimes you purchase an item with a trouble. Like this Lionel 610 passenger car, which I could purchase for bargain, but without a roof. Later I found a roof, but it was half an inch too short.
Therefore, I first splitted the roof exactly in the middle with a Dremel equipped with diamond wheel. Next, the roof was extended with a brass strip, soldered back together, plastered, sanded and painted with black anti-rust primer.
Now all that is left to do is to restore the rest of the passenger car.