Showing posts with label Pre-war Lionel trains restoration. Show all posts

Sunday, January 08, 2023

Lionel 817 caboose

 Now that sand-blasting has simplified rust- and paint-removal, I thought it would be nice to tackle one of the nicer train cars waiting for restoration; the Lionel 817 caboose. It always looked a bit crappy with its fainted colours and rust spots. Especially the dark green roof was severely scratched and the brass had a bit too much patina. So time to bring it back to former glory. 
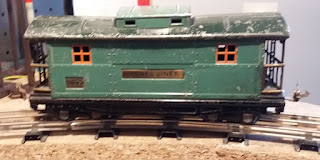
Lionel 817 as received
The roof can be removed easily and opens the main compartiment with a historic layer of dust. Then the bogies and the brass side panels are simply removed.

The bottom plate has a by-gone label with lubrication instructions. I think this is the last time we get to see it.

Lubrication instructions

Once the bogies are removed, the six tabs that fasten the main body to the bottom plate can be straightened as well as the four brass tabs securing the brass side panels to the bottom plate. Then the whole thing comes apart.

Then the further the disassembly is simple. The metal parts are cleaned (dedusted) and sand-blasted. Here you can see what a few seconds of glass pearls has done to the top. See, the before and after, below.


Then the rest follows quickly. Also the wheels, axles and latch couplers benefited from a quick blast of glass pearls. And after a few hours all parts shone. The paint disappeared fast and simple from the flat pieces, but it took more time to remove the paint around the window ridges and rivets.


So, the brass was polished first with a brass brush on a Dremel-type tool followed by the polishing disc with metal polish and cleaning with white spirit. All painted objects were first primed. Dark green and black glossy rattle cans were about and the "Peacock Green" had to be purchased from the local hardware store, where we argued to either use RAL6033 or what is "Peacock Green" according to the local paint producer. Personally, I found RAL6033 a bit dull and this colour much brighter, so I followed the company's recommendation.


The reassembly was straightforward. I added a third rail pick-up roller to one of the bogies to enable lightning. That pick-up assembly was purchased a few years ago at the late shop of George Tebolt.


After the light was checked, the roof was snapped on, and the caboose was ready. Ain't she gorgeous.


Time to take it for a run around the tracks.

Tuesday, April 28, 2015

To restore or to refrain

When do you decide to restore a toy train and when do you decide to leave if as it is?
That depends on the rarity of the object, the condition and your own personal motives. Most Lionel prewar toy trains are common and ubiquitously available in the Northern America's. Consequently, many prewar wagons can be purchased for 10-20 USD. Since most toy trains have been played with, they are often dented, bended, spot-rusted and some parts might be missing. But spare parts are either available or can be machined, since they are metal-based.
The conservatives thinks that we should leave these toy trains as they are right now, with all their character, patina and age. But then we are preserving their current condition, not their original condition. They were not played with with dents and nicks. Personally I favour to try to return them back to the original condition, as close as is possible. Then you can experience the same as kids did some 80 or more years ago. The bright colours, the tin rattle on the rails, the smell of ozone.
I will make exceptions for rare objects. I would not like to touch those. But since these tend to be expensive and therefore typically end up somewhere else, this has not created any issues, yet. Since fewer toy trains survived WWII in Europe, most prewar toy trains tend to be expensive, especially from the Märklin-brand. Therefore, I prefer to avoid those and stick to cheap and cheerful mass-produced American brands.
Well, Frank, I am sure you would agree that this 814 boxcar can better be restored.

But this is not a black and white polarised discussion. With more and more prewar toy trains in poor to extremely poor condition being marketed via Internet auction sites, not restoring simply means letting it rust away. Especially for this category, a full restoration yields personal satisfaction, having salvaged it from the trash bin.
This Lionel 812 gondola has already been rescued from a rusty disintegration. There is no point to leave it in this dilapidated condition.

Monday, March 04, 2013

Restoration is a personal matter

Every few months people e-mail me and ask me if I would like to restore their old toy train items for them. The answer is no. Restoration is a time consuming activity that involves many choices. In case you would like to capitalise the labour costs, you would soon figure out that restoring is a non-economical process. And that is exactly the point. Restoration is done because of astonishment, admiration and appreciation for an old toy object. It is my hobby, not a profession. While restoring a toy train object, I get a bond, a personal appreciation, with that object. That is why I do not want to part from objects I have had held in my hands and saw being returned to former glory.
Additionally, while restoration you need to take many choices. These are often personal and arbitrary choices. There is no one way to do it all. And many times compromises are required between originality, time, costs, availability of spare parts and some level of creativity. My choices are not necessarily the same of those that would like to have their toy trains restored. The whole concept of liability versus the freedom of restoration just gives me the creeps and that why I simply say NO. So I do not restore for others. Nevertheless, I do appreciate to make others enthusiastic and where possible assist others with their own restoration projects.

Sunday, August 12, 2012

Back on old tracks

In the Museé du Rail in Dinan I found some old 042 radius pre-war tracks of Hornby-Meccano, that felt correctly compatible with Lionel pre-war high rails. And yes they are. I just needed to clean and place the pins different. These Hornby-Meccano rails have two pins upward and one downwards. So, I removed most of the pins, re-inserted them in the right direction and made them full compatible with my old Lionel tracks. The old Lionel tracks had been stored in a box since 1994, so it was time for a good thorough wash. That took me half a day. Afterwards all the tracks handled nicely. I laid a small oval and measured the resistance between the inner rail and the outer rail, it was more than 1800 kOhm, so although not perfect, still sufficient. These tracks date from the 30's and they have that special tin-plate feeling. The sound of a train passing on these tracks, is just fine for me.
Pre-war Lionel and Hornby Meccano rails do couple nicely

These old tracks run fine

Monday, October 10, 2011

Lionel 607 finished as 603

Today the light bulb wire was connected to the third rail contact and the light lit. The reassembly went really smooth. The decals on the red passenger car body "The Lionel Lines" were water transfers from Papa Les Trains. I did not have any "Pullman" or "603" decals left, so I made my own with "Avery Glas-Dekofolie", which is a locally available brand for making glass window decals on a sticky transparent plastic sheet basis.
The couplers are new and they were necessary, because the rusty 607 wreck came without any.
The highly glossy black roof paint allows me to see all the small dents that I missed when I was filling and sanding the big dents. Well, it ain't 100% smooth, but at least it is much better than how it was.Although some Lionel collectors might argue that I should have used 607 decals and should have used burgundy red inside of bright red, I like it better this way. First of all, it is much better of than how it was and I sure hope to see it running with the 604 and 607 I have already restored and ready.


Sunday, September 18, 2011

Lionel 607 painted

This weekend, I finished painting the Lionel 607 passenger car. I choose a middle red colour and not the more typical burgundy red colour. So, this passenger car will look more like the MTH remake than the original, but I just like this colour more. Last week, I already painted everything, but there was this one hair of half an inch that had landed on the wet black glossy paint of the roof.
Therefore, I had to redo the whole roof, but now I shines without this one curly hair.

I decided to assemble the window-pane in the car body and to put the roof on, just to see how the final result will look. There is still a couple of things to do. The axles still have some rust and need to be treated again. The wheels need to be polished better, to get rid off the last bits of black sooth.
Additionally, the lamp holder is severely rusted and it will be difficult to get it in a better state, because of all the grooves. Perhaps I will replace it with a new part. Well the couplers were also gone, so it will get some new shining couplers as well. The brass tank lids have some rust grooves and although it is polished and it shines, these grooves remain visible. A testomony of age, I would reacon.


Some blokes asked for it, so here is an additional picture of the All Nation Line C&LE box trailer kit in finished condition, well all but the couplers.

Sunday, December 05, 2010

Lionel 289E running

Although it was already late and the light conditions poor, I did try to make a small video to show the Lionel 289E engine running. One of the last issues I faced with this engine were the smooth and slippery drive wheels. On many 027 curves and slopes the wheels just spun hopelessly. Some friends advised me to roughen the wheels. I tried by scratching the wheels, but still they spun on the track. Then I applied a 3 mm wide strip of duck tape on both the rear drive wheels and that seems to do the job.

Thursday, October 14, 2010

Lionel 289E ready to shine


After three coats of Tamiya TS38 gun metal the Lionel 289E engine shell was ready and beautiful. The two side number plates were too rusted to mount back on, so I used replacements from George Tebolt. The front L-symbol was kept original and also the the driving rods were polished and kept original. They are a slightly corroded, but then this lady is from 1937. The two red classification lights also came from George Tebolt. It is the first time in seventy years that this grey lady wears her classification lights again and they do look good.
Now it is time to sit back and enjoy the grey grace and let her run. Welcome back!

Sunday, September 19, 2010

Lionel 289E finally clean


The Lionel 289E is a heirloom item and so I waited a few years more than normal to remove the paint and get it repainted. The various paint layers where more difficult to remove than I previously had experienced. The top-layer was a hand-brushed thick layer of alkyd paint and underneath was the original gun-metal coating. I started with the conventional cooking pot method with old-fashioned near boiling soap-water. That removed most, but not all. Especially from the inside of the engine shell, hardly any paint was lost. People on internet-fora advised me not to sand-blast the item because of the fragile nature of die cast iron. So, I continued with carpet-glue-remover. This produced a thick gray gel of swollen paint that could be scraped off. Then I used the dremel and a brash brush attachment the remove the last paint residues. The cast iron shines and turns a bit dull in a few hours time. It behaves so different than tin-plate. Here is small picture of the shell ready for primer.

Friday, April 16, 2010

Lionel 259T finished


Well it took me 2 slow years, but I got it done. The Lionel 259T tender is finished and it is time for a test ride with the 259E engine. The tender was purchased in October 2007 and when it arrived the corroded nature was obvious. Additionally, the handrails and two journal boxes missed. I completed the disassembly, rust removal and painting process already a year ago, but I struggled with the handrails. I wanted a freestyle restoration project with some self made handrails. Initially I choose brass 2-3 mm diameter brass pipes to solder these into the handrails. But they turned out to be too sturdy and nearly impossible to assemble correctly through both holes. I understood late that some flexibility would yield a better solution. It took a while before I saw the linchpins lying about at home and I got the idea. I drilled 1 mm holes through the linchpins head and stuck 1 mm pre-bended brass wire through it, soldered it and polished it. Well I am happy to have finished a pre-war car again. There are still too many neglected toy train cars waiting for some attention and care and I not sure yet which one will be next.

Tuesday, February 19, 2008

Lionel 1689T tender


Many Lionel streamlined pre-war steamers came with a 1689T tender. They are abundant and can be scooped up on Ebay for about 10 USD or less. Although simple and abundant, the design is beautiful due to simplicity: a simple interaction between straight lines and curves.

This particular tender is a heirloom item. I received it in poor overpainted condition, complete with light grey paints blobs. It was really nice to repaint it gun-metal and to clean the journals, drawbar, coupler and shields. Simple pleasure. This just proves again that toy trains is not about money but about appreciation and enjoyment.

Tuesday, February 12, 2008

259E running

The Lionel 259E engine now dislikes another 027 switch. For some reason it slows down on one particular switch, while other engines run without any issues over it. Nevertheless it runs good (besides on that one switch) and it is nice to show it. So here it comes. It just shows that a dusty and rusty toy train that did not move any more can be revitalised to a truely well running toy with character and that feels good.

Saturday, August 18, 2007

Lionel 259E


A few months ago, I found a Lionel 259E engine in relative poor condition on Ebay. Precisely good for Lionel's junkyard. When it arrived two things were crystal clear: 1 much work would be necessary to get this engine running again and 2 what a beautiful detail this engine has. Basically the engine block and the drivers were covered with rust, dust and hardened grease. The boiler front was bent and the rear truck was missing. When placed on tracks it didn't move an milliinch and only made some rumbles and noices.

Yesterday, I disassembled the engine and cleaned the engine. First, with a cloth and toluene / white spirits to remove the black tacky hardened grease and then with a brass brush to remove the residue. Oh boy, my hands were black! The brushes are relatively thick and have a scratched surface. I sanded them gently and placed them back for the moment. Eventually they need to be replaced. The armature was cleaned and then everything was lubed again. I placed a LED light bulb in the socket and that lighthed directly, but the engine did not do a thing. The wires are in poor condition. They are old cotton covered and this crumbles when you touch them. For the moment I protected a few open spots with insulation tape, but it is clear that I need to get the soldering gun ready for rewiring. Then I focussed on the E-unit. I unscrewed it and dust fell out. After light shaking two small corroded copper rings fell out. The drum had been fully disintegrated! No wonder that the engine did not move. I cleaned the E-unit out and found that the plunger was stuck. After more cleaning and lubing it started to move again. Next, I placed a new drum in the E-unit and worked a little more on getting the plunger falling freely down again and yes the engine runs again!

It is a relief and a feeling of satisfaction in one. The engine has made many loops already on my layout and the E-unit is still not 100% OK ( a few times forward motion is passed), but it runs and runs good. Surprisingly, relatively high voltages are needed to get her moving, but then she runs smoothly. This high initial electric potential could be related to the poor brushes. Next the rewiring needs to be done and after that the engine need a rear truck and a good derusting treatment. Priming and repainting will be necessary and since many of the brass pieces lost their luster, these need to be polished or replaced as well. Papa-Les-Trains placed some really nice photo's of a restored 259E on the web and I do not think I will get it so far, but I will try to bring her close. It just will take a few months.

Sunday, February 11, 2007

Removing corrosion from brass plates


The Lionel 812 was in poor condition when it arrived. The tin plate was corroded on many places. In one place the corroded tin-plate contacted the brass plate directly and made it turn dark brown (second plate from the left on the photo). Although I do not understand the chemistry completely, but then the exact composition of the tin-plate and the brass are also unknown, it is clear that the brass was affected quiet strongly. I tried to clean this dark-brown brass with a household brass cleaner, metal polish, washing and basically it did not work. Only carefull light sanding did the trick and got the brass back in original luster. I am still sanding and polishing, but it alreday looks much better.
The photo's on the left show the plates when I started cleaning and on the right how they are now.